Blog

  • A Kennel in Blender

    A Kennel in Blender

    About a year ago I have started experimenting with various all kind of graphical stuff. From simply learning how to draw with pencils of varying hardness, to figuring out how to use digital tools like Krita or Inkscape. Recently I decided to give Blender a three dimensional try.

    Project

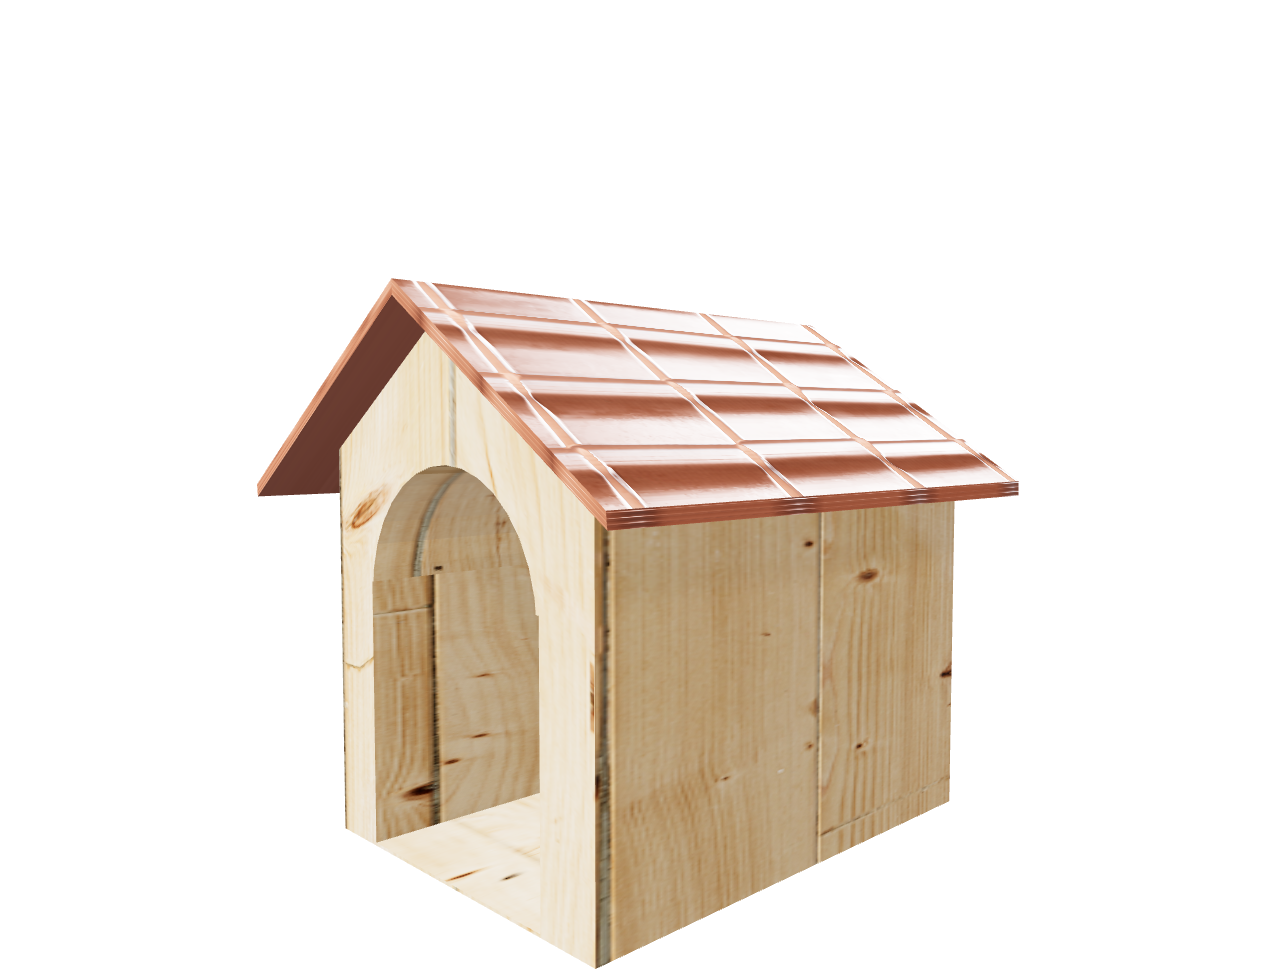
    I find that the best way to learn a tool is to try a simple project. For me, in honour of my Shetland sheepdog, I choose to create a virtual kennel. In my opinion it the perfect beginner’s task. It is more complex than a cube / cylinder variant but the geometry stays straightforward. Not every face is parallel, there are multiple objects, extruding to be done, …

    Creating the objects

    The first step was to turn the starting cube into a house shaped object using basic editing tools include the loop cut tool.

    So far it is just a big bulky block, the desired kennel needs an opening. To create opening I created additional objects (one cylinder and one elongated cube) which I then used to extrude the original object using a boolean modifier. Basically I cut a hole. Finally I added a second object to be the roof, which I placed on the first object using snapping.

    Adding textures

    The next step is to add textures to the two objects. I choose to make the base wooden, and use red roof tiles for the roof. I downloaded the assets from https://ambientcg.com/.

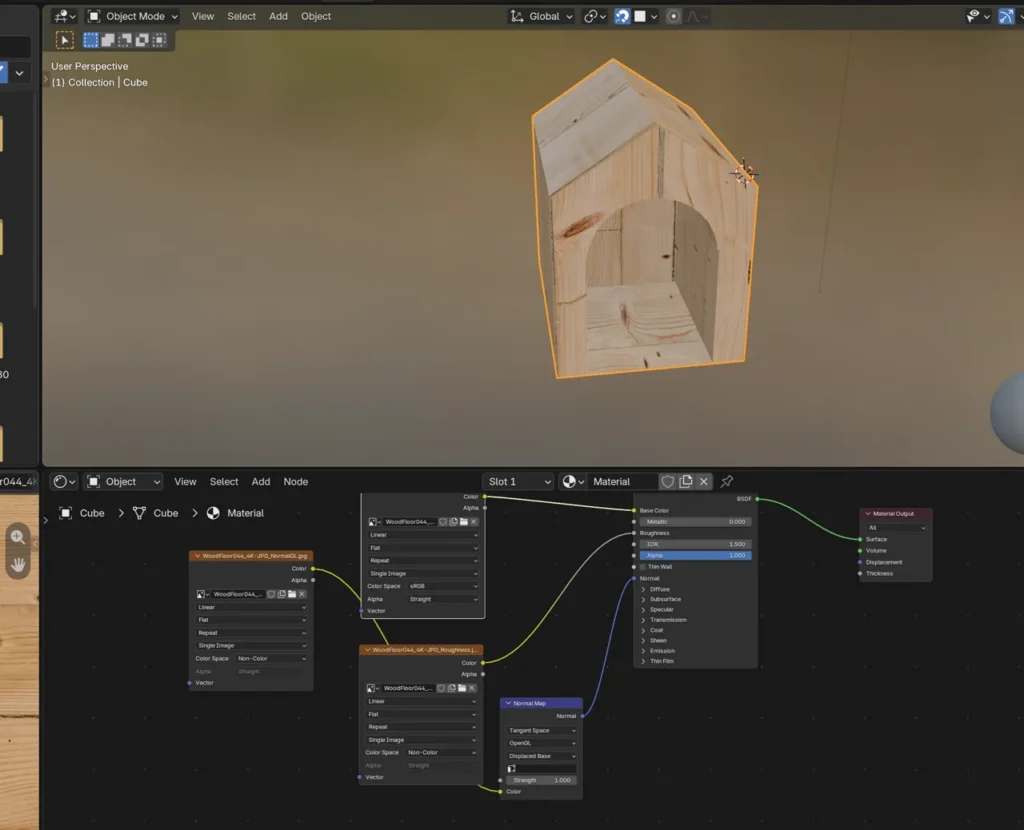
    Applying textures is quite straightforward. It is mostly drag and dropping texture files into Blender and connecting the different boxes appropriately. It is almost as simple as putting the red wire into the red socket, blue wire into the blue socket once you understand the purpose of various files.

    Applying a texture is not just mapping an image to a 3D structure. There are other files like normal mapping which will fake bumps and dents in the lightning without adding details to the object.

    View of Blender's texture mapping

    Texture mapping doesn’t always work on the first try. The roof for instance was stretched.

    Fixing textures through UV unwrapping

    The roof looks just wrong. That is because when mapping the texture to the roof, the right side has a large chunk of the image but the left gets a small chunk which ends up being stretched.

    The reason for that is how texture is mapped onto the object. This process is called UV unwrapping. To fix the unwrapping I identified the face that was squashed and stretched it out.

    Finally this fixes the unwrapping and how the texture looks

    Publishing to the web

    To export my asset I decided to create a GLB file to then incorporate into a web friendly tool. The challenge here is to avoid huge web unfriendly files. To achieve this I used compression (in my case draco compression) and updated my textures 1K formats instead of 4K. On more complex models there is more to do (see https://docs.blender.org/manual/en/latest/addons/scene_gltf2.html). Here is the result :

  • Choosing WordPress over Hugo

    WordPress and Hugo are two radically different tools you can use to create and manage your personal blog / portfolio / whatever website.

    WordPress is a CMS platform, an web hosted application, where you can manage, write, update and post content of all kinds (mostly pages and posts). Hugo is a static site generator, which is a tool to create raw HTML/JS/CSS websites to publish on the internet – no web hosted application involved.

    In simpler terms, WordPress is a bit like Word, you edit your posts / pages directly in a graphical tool. In contrast Hugo treats websites like Software, but instead of converting source code into applications you convert markdown files into HTML.

    Unsurprisingly most people will prefer the simplicity of a tool like WordPress, but there is fondness for Hugo-like static website generators among IT people (e.g. Software developer). As a software developer one could expect me to choose Hugo (or an equivalent) over WordPress. But I made the decision to move back to WordPress. Here are some of the reasons.

    Static sites are not significantly faster

    Static websites generated by Hugo are on paper faster than CMS like WordPress. In practice the difference isn’t that big.

    WP-beginner, a WordPress website dedicated to WordPress support loads its media heavy pages in about 200 ms. Gentoo Linux official website, static site generated by Jekyll (an alternative to Hugo) loaded in under 100ms. In both cases the load time in under 250 ms.

    For my personal website, my former blog hosted on Github Pages generated by Pelican (yet another Hugo alternative) would load in 150 ms and my new self-hosted WordPress blog loads in 250 ms according to the Uptime Robot monitoring system.

    WordPress is still fast enough. It is because of caching. Most well configured websites will use some of caching, which is the digital equivalent of not doing the same work more than once but instead keep a copy of the final result (with the caveat that in digital world you need throw away the cached result sometimes). This means in practice a well configured website will usually behave like a static site for most pages.

    Web content is not software

    Websites are not software. Most static website generators encourage a development workflow. This means all of the following : editing configuration files, compiling markdown pages into HTML, using Git to commit and push your page to a platform like Github and automate delivery through a CI/CD pipeline.

    There are use cases for managing websites these ways (e.g. if you do a lot of automated posts). Writing a page in Markdown and then checking how it renders in your browser is a bit rough. With WordPress with a click of a button you can check how things render on mobile, add alternate text to images, … You don’t have to worry about Github actions failing. Basically you focus on what you publish and little less.

    WordPress has a better ecosystem

    After reviewing themes for Hugo and for WordPress I realised there is notable cultural difference between the two ecosystem. Not only I found Wordpres to have a better themes, they were designed to enable easy customisation for end users easy. One example of this is changing the accent colours. WordPress themes can be tweaked from the UI with a colour picker. Hugo themes can be complex. In one case the CSS file governing the colour theme was generated by a Node.js program. I haven’t found a general pattern in how theme are managed in Hugo. I’d rather not bother learning a couple of different ways to tweak colours when evaluating themes.

    Another strength of the WordPress ecosystem is its extensibility through plugins. Here is a couple of things I do with WordPress. First I gather statistics on many visits I get and which page (including non existing ones) are targetted. People targetting non existing pages could be symptoms on a link somewhere on the internet to a non longer existing page. You can take advantage of this with another tool I use call Redirections. I use Redirections to make sure the URLs (no matter how old they are) are still valid. No need to edit nginx configs and needless to say this wouldn’t be easy with most static site hosting solutions.

    Furthermore extending beyond a simple site is easy with WordPress, but tricky with static websites. Let’s say you want to start an e-commerce site with SEOs and statistics. With WordPress you have plugins for that directly built-in, but with static sites you have to create hooks to third party services (which can be still used with WordPress so you get the best of both worlds).

    Other considerations

    Always check the fine print. Just because static site hosting is free doesn’t mean there aren’t caveats. Let’s say you do not explicitly agree to allow AI to be trained on your content. You should know many free static hosting websites (e.g. Github pages, Netlify) will have you agree to AI training on your content in their terms and conditions.

    Cyber-security is sometimes the reason why static site generation is preferred. The idea here is that a static site does not require a database and code (usually PHP) to generate pages when live. If you self-host then a static site will have fewer moving parts compared to WordPress (self-hosted or not). However if you use a service like Github pages this is no longer true. When using Github pages chances are you are using third party Github actions which could be a source of cyber security concerns, not to mention all of the good practices to follow with authentication permissions, repository visibility, SSH keys, …

  • Managing secrets in Nix using Agenix

    If tomorrow my laptop were to go in flames, I would lose two things. First I would lose my data, and this is what backups are for. The second thing I would lose is my configuration (software installed, network setup, …). Nix offers a way to preserve this (assuming the configuration is replicated externally like GitHub).

    But storing one’s configuration is Nix comes with challenges. One of those challenges is how to handle secrets. Some parts of the configuration is tied to secrets : passwords, keys, API tokens, … . The question is how to manage this. Usually it requires some form of cryptography.

    How I store my nix configuration

    Before I explain Agenix, I think it is worth to explain how I manage my Nix configuration on the various machines I have installed Nix. This is because Agenix integrates to my nix configuration, and Agenix makes more sense in context.

    There is the file layout of my Nix configuration over at (GitHub)[https://github.com/mparusinski/nix-config/]

    .
    ├── build.sh
    ├── flake.lock
    ├── flake.nix
    ├── modules
    │   ├── nixos
    │   │   ├── users.nix 
    │   │   ├── ...
    │   │   └── gc.nix
    │   └── home-manager
    │       ├── git.nix
    │       ├── ...
    │       └── zsh.nix
    └── hosts
        ├── dell-precision-7530
        │   ├── configuration.nix
        │   ├── hardware-configuration.nix
        │   └── home.nix
        └── wsl1
            ├── configuration.nix
            └── home.nix


    There are two parts each divided into two sub-parts : * The build system build on top of Nix and Flakes * flake.nix and flake.lock describe how to build a nix configuration on a given system. * build.sh which launches the appropriate Nix build command for the underlying system. * Nix modules which defines the system configuration * modules defines reusable configuration code across various systems * hosts defines configuration for given systems.

    Naively secrets (passwords, keys, API tokens, …) would be stored in plain text somewhere in the files mentioned here.

    Agenix explained

    To include secrets safely in a Git repository storing configuration there are multiple options. A common choice to externalize secrets. Essentially storing them not in Git. That could be simple files one has to place manually, key vaults, etc. But in that case you can’t simply replicate configuration unless you maintain those secrets. Another choice is to encrypt the secrets before hand, and, it has to be said, making sure the encryption key does not end up in Git.

    Agenix offers a way to include those secrets encrypted in Git. Furthermore Agenix is aware of actors involved. By actors I mean the repository maintainer, i.e. you, the systems that will have to decrypt the secrets, …

    Agenix is build on top of age which is an encryption tool. Its particularity is Age encrypted secrets can have multiple recipients and can use SSH asymmetric encryption (a key for encryption, a key for decryption). Agenix uses age to make the secret decryptable by authorized actors : you and the systems (which have their own SSH keys) that need to access the secrets and no one else.

    To be used Agenix needs to be installed to encrypt secrets but you also need to specify the nix configuration to setup agenix (so it can manage secrets) which amount of having it installed, the secrets specified and when to use them.

    Managing secrets

    The first step is to install Nix. In my case I am using flakes so I followed the steps from install guide for flakes.

    So more details about using flakes for your NixOS configuration see this link If you want to pass agenix to your configuration module file (usually named configuration.nix) you need to specify the specialArgs = { inherit inputs; } option when calling nixpkgs.lib.nixosSystem. To check if agenix is correctly installed run agenix -h.

    Now that agenix is installed the next step is to setup secrets. Inside your nix configuration folder do the following

    mkdir secrets
    cd secrets
    touch secrets.nix

    This means that the secrets.nix file will be version controlled. And start editing the secrets.nix file.

    let
      # SSH public keys of the users who will be adding secrets through agenix
      john = "ssh-ed25519 AAAAC3NzaC1lZDI1NTE5AAAAIJCizmOo5KevfHd6pqwxVjgvVYWv4Az5TbAclvuhF2AC";
      users = [ john ];
    
      # SSH public keys of the systems who will need to access the secrets
      webserver = "ssh-ed25519 AAAAC3NzaC1lZDI1NTE5AAAAIDA1+TbC/tXsVAKUjSzipoC0ibOgSWuNvzVdb8Xxwi0T";
      systems = [ webserver ];
    in
      {
        # Specify for each secret who has access to it
        "apikey.age".publicKeys = users ++ systems;
      }

    Once this is done you can create the secret files. In the above example that would agenix -e apikey.age. This file contains the encrypted secret to be used.

    Once you have done you will need to specify the secrets twice in the configuration nix files: once to declare the secret with the location of the age encrypted file, the second time to link the secret to some configuration item.

    {
      # configuration.nix
      # ...
      age.secrets.apikey.file = relativepathto/secrets/apikey.age;
      # ...
      # some service requiring the above secret
      services.special.config.adminFile = config.age.secrets.apikey.path;
    }

    Limitations

    From my experience sometimes Agenix does not always work smoothly with Nix. For instance in one case the nix build system would invalidate a prometheus configuration because the Agenix path would not exist yet. This had to with the prometheus Nix module validating the generate configuration yaml (see here).

  • Switching systemd-boot to GRUB on Archlinux

    I intend to use BTRFS snapshots, snapper and pac-snap to be able to rollback archlinux if an update goes wrong. However current it uses systemd-boot and the tools I intend to use required GRUB.

    Requirements

    This tutorial is only meant for UEFI systems. It requires a EFI partition mounted under /boot with enough disk space (in my case 512 MB should be enough).

    Install efibootmgr to validate changes

    Swapping to GRUB with BTRFS support

    Install grub and run

    grub-install --target=x86_64-efi --efi-directory=/boot --bootloader-id=GRUB

    Edit the file /etc/default/grub and copy over the relevant fields from the systemd boot loader usually found under /boot/loader/entries/arch.conf

    For instance if your systemd-boot config looks like this

    title   Arch Linux
    linux   /vmlinuz-linux
    initrd  /intel-ucode.img
    initrd  /initramfs-linux.img
    options cryptdevice=UUID=xxxxxxxxxxxxxxxxxxxxxxxxxxxxxxxxxxxx:crypt root=/dev/mapper/crypt rootflags=subvol=arch_root splash rw

    You need to copy options field to GRUB_CMDLINE_LINUX but do not copy root

    Then generate the GRUB configuration grub-mkconfig -o /boot/grub/grub.cfg and check the content of the file.

  • Switching between High DPI and Low DPI in XMonad

    Context

    I enjoying using a tiling window manager on Linux. However it is hard to get them to work with my multiple monitor requirements.

    My situation can be described as follows: 1. I have multiple monitors, not all of them have the same DPI. 2. Not all of them are connected at the same time as I use a laptop. Sometimes I no monitors, sometimes three. And I like to plug them while the session is open. 3. Whenever possible I would like to have the highest DPI setting possible.

    DPI means dots per inch and loosely speaking refers to resolution. High DPI monitors have such a high resolution they require bigger fonts and upscaling.

    In general on Linux, Wayland based window managers and desktop environments, like Gnome or Hyprland handle the best high DPI settings. They support fractional scaling (for when monitors are halfway between low and high DPI). They work nicely with mixed setups like described above.

    However I am not yet satisfied with either Gnome (which isn’t a dynamic tiling window manager), or Hyprland (which seems to have a static approach to multiple monitors). And I haven’t tried Sway yet. In the future I planned to revisit Sway and Hyprland but in the meantime I wanted to get XMonad to work well because I like how XMonad handle multiple monitors.

    Finding out current DPI

    I wrote a simple script using xdpyinfo to fetch information about the current DPI:

    #!/usr/bin/env bash
    xdpyinfo | grep dots | tr -s ' ' | cut -d ' ' -f 3 | cut -d 'x' -f 1

    This will return a number giving the current DPI setting. The purpose of this script to allow XMonad to tell the DPI setting and adapt accordingly. In my case I use it to tell which XMobar config to load (either a low DPI setting or a high DPI setting).

    Creating configs for each DPI setting

    The main trick I use for multiple DPI setting is having multiple config files for each DPI config. The files I differentiate are: * .xsession files for loading Xft settings * xmobarrc files for the XMobar status bar (with different dpi settings)

    So for instance here is the two x session files

    FileLow DPIHigh DPI
    X Session fileXft.dpi: 96 Xft.autohint: 0 Xft.lcdfilter: lcddefault Xft.hintstyle: hintfull Xft.hinting: 1 Xft.antialias: 1 Xft.rgba: rgbXft.dpi: 192 Xft.autohint: 0 Xft.lcdfilter: lcddefault Xft.hintstyle: hintfull Xft.hinting: 1 Xft.antialias: 1 Xft.rgba: rgb
    XMobar configConfig { overrideRedirect = False , font = "Fira Code 12" , additionalFonts = [ "Font Awesome 6 Free Solid 12" , "Font Awesome 6 Brands 12" ] , bgColor = "#2E383C" , fgColor = "#D3C6AA" , dpi = 96 , position = TopH 30 , commands = [ Run Cpu [ "-L", "5" , "-H", "50" , "--high", "red" , "--low", "green" ] 10 , Run Battery [ "--template", ": % - " , "--" , "-O", "AC" , "-o", "Bat" , "--high", "green" , "--low", "red" ] 10 , Run Memory ["--template", "Mem: %"] 10 , Run Date "%a %Y-%m-%d %H:%M" "date" 10 , Run XMonadLog ] , sepChar = "%" , alignSep = "}{" , template = "%XMonadLog% }{ %battery% | %cpu% | %memory% | %date% " }Config { overrideRedirect = False , font = "Fira Code 12" , additionalFonts = [ "Font Awesome 6 Free Solid 12" , "Font Awesome 6 Brands 12" ] , bgColor = "#2E383C" , fgColor = "#D3C6AA" , dpi = 192 , position = TopH 60 , commands = [ Run Cpu [ "-L", "5" , "-H", "50" , "--high", "red" , "--low", "green" ] 10 , Run Battery [ "--template", ": % - " , "--" , "-O", "AC" , "-o", "Bat" , "--high", "green" , "--low", "red" ] 10 , Run Memory ["--template", "Mem: %"] 10 , Run Date "%a %Y-%m-%d %H:%M" "date" 10 , Run XMonadLog ] , sepChar = "%" , alignSep = "}{" , template = "%XMonadLog% }{ %battery% | %cpu% | %memory% | %date% " }

    The main notable thing is that the font dpi changes in both case. The rest is not important in this context.

    Toggling between DPI settings

    To switch between the two DPI a second script is created :

    #!/usr/bin/env bash
    
    DPI=$(~/.local/bin/what-dpi.sh)
    if [ "$DPI" -eq "192" ]; then
        echo "Switching to low DPI (96)"
        xrdb -merge ~/.config/xsession/xsession.lowdpi
        xrandr -s 1920x1080
    else
        echo "Switching to high DPI (192)"
        xrdb -merge ~/.config/xsession/xsession.hidpi
        xrandr -s 3840x2160
    fi


    This script picks up the current DPI setting and applies the new setting matching the opposite DPI setting. It does three things : 1. Change the Xft settings for fonts 2. Change the screen resolution

    Incorporating in XMonad

    Now we incorporate the logic in XMonad. First I define a data type (to follow good programming practices)

    data DPI = HiDPI | LowDPI

    I create a status bar hook that takes a DPI as an input (and monitor number) and creates the appropriate instances of xmobar:

    import XMonad.Hooks.StatusBar
    import XMonad.Hooks.StatusBar.PP
    
    mySB num dpi = statusBarProp ( "xmobar -x " ++ show num ++ dpiConf dpi) (pure myXmobarPP)
      where dpiConf LowDPI = " ~/.config/xmobar/xmobarrc.lowdpi"
            dpiConf HiDPI  = " ~/.config/xmobar/xmobarrc.hidpi"
    
    myXmobarPP :: PP
    myXmobarPP = def 
      { ppSep             = " | "
      , ppCurrent         = xmobarColor "#7FBBB3" "" . wrap "[" "]" 
      , ppVisible         = xmobarColor "#A7C080" "" . wrap "[" "]" 
      , ppHidden          = xmobarColor "#E67E80" "" . wrap "(" ")" 
      , ppHiddenNoWindows = xmobarColor "#D3C6AA" "" . wrap " " " " 
      , ppTitle           = xmobarColor "#D3C6AA" "" . shorten 60
      , ppTitleSanitize   = xmobarStrip
      }


    I then hook this into the main script

    fetchDPI :: IO DPI 
    fetchDPI = do
      (_, maybeOutH, _, _) <- createProcess shellCmd { std_out = CreatePipe }
      maybe (return LowDPI) processOut maybeOutH
      where shellCmd = shell "~/.local/bin/what-dpi.sh"
            processOut :: Handle -> IO DPI 
            processOut h = do
              output <- hGetLine h
              let currDpi = readMaybe output :: Maybe Int 
              return $ maybe HiDPI intToDPIEnum currDpi
              where intToDPIEnum x = if x == 192 then HiDPI else LowDPI
    
    main :: IO ()
    main = do
      dpi <- fetchDPI
      xmonadMain dpi 
      where xmonadMain dpi = xmonad
                           . ewmhFullscreen
                           . ewmh
                           . withEasySB (mySB 0 dpi) toggleStrutsKey
                           . withEasySB (mySB 1 dpi) toggleStrutsKey
                           $ myConfig dpi 
                           where toggleStrutsKey :: XConfig Layout -> (KeyMask, KeySym)
                                 toggleStrutsKey XConfig { modMask = myModMask } = (myModMask, xK_b)

    So let’s explain what happens : 1. When XMonad launches it fetches the current DPI from the what-dpi.sh script. This part is done in fetchDPI and it is basically a lot of boilerplate code to start a process and return the DPI setting with lots of error off ramps to default to a low DPI setting (in exotic cases it is safer to assume low DPI) 2. Launch the status bar using withEasySB multiple times as we may have multiple monitors with the appropriate DPI setting.

    Now this allows XMonad upon start to adapt but not when monitors are plugged in or plugged out. For this I create a keyboard shortcut as follows

    myKeys     =
      [ ("M-v",                     toggleSmartSpacing)
      , ("<XF86MonBrightnessUp>",   spawn "brightnessctl s +10%")
      , ("<XF86MonBrightnessDown>", spawn "brightnessctl s 10-%")
      , ("<XF86AudioRaiseVolume>",  raiseVolume 3 >> return ())
      , ("<XF86AudioLowerVolume>",  lowerVolume 3 >> return ())
      , ("<XF86AudioMute>",         toggleMute >> return ())
      , ("C-<Print>",               spawn "scrot -s")
      , ("C-'",                     spawn "~/.local/bin/switch-dpi.sh; killall xmobar; xmonad --restart")
      ]

    Here I add a keyboard shortcut Control-’ to request a DPI switch, kill xmobar and restart xmonad.

  • Managing databases users using nix

    Recently I had the following challenge: manage database (robotic) users using nix. More specifically I wanted to declare a list of MariaDB/MySQL users, alongside passwords, and permissions using nix. And while nix has some options for this (e.g. services.mysql.ensureUsers.*.name). Some aspects can’t be declared with nix options like the credentials or its permissions for given databases.

    There is a way to solve this using nix using three steps: 1. Declaring the user configuration in an object 2. Creating nix packaged scripts that will apply a configuration to the database 3. Creating a systemd unit that runs the previous scripts when appropriate

    In this article I will go into details on how this is done. Note: although I focus on MySQL/MariaDB, the underlying principles can be applied for PostgreSQL, Redis, …

    Declaring the user configuration

    The first step is to encapsulate the information required for configuring a user in a nix object (key-value dictionary). In my case it looks like this

    dbUsecaseConfig = {
      database = "usecase_db";
      passwordFile = config.age.secrets.usecasePass.path;
      username = "usecase_username";
      hostname = "usecase_hostname";
    };

    Should be self explanatory. Note passwordFile is a path to a file, here I use agenix to manage secrets, which decrypts the password file with adequate permissions to prevent leaks (see article about agenix).

    Set up script to apply configuration

    The second step is to create a script that applies the configuration. This is done using pkgs.writeShellScript which generates a shell script and stores it as nix component (under /nix/store/).

    The syntax of the function

    writeShellScript "file-name"
      ''
      Content of the file
      '';

    The file name here is not very important. The content of the script, however, is. To make this modular, I use a function that takes a configuration as input and produces a corresponding shell script:

    applyMySQLConf = 
      {
        database,
        passwordFile,
        username,
        hostname
      }:
      pkgs.writeShellScript "applyMySQLConf"
        ''
          PASSWORD=$(cat ${passwordFile})
          ${pkgs.mariadb}/bin/mysql -u root -e "GRANT ALL PRIVILEGES ON ${database}.* TO '${username}'@'${hostname}' IDENTIFIED BY '$PASSWORD';"
        '';

    The details will depends on the use case. For instance for a PostgreSQL database the actual commands used in the script will change.

    To generate a script for a given configuration will look this:

    dbUsecaseConfig = {
      database = "usecase_db";
      passwordFile = config.age.secrets.usecasePass.path;
      username = "usecase_username";
      hostname = "usecase_hostname";
    };
    usecaseConfScript = applyMySQLConf dbUsecaseConfig;

    Automatically apply the configuration using systemd

    Now, we have a script which applies a configuration, but nothing actually runs the script. This is solved by using systemd services :

    systemd.services.apply-mysql-conf = {
      description = "Apply MySQL configurations";
      wants = [ "mysql.service" ];
      wantedBy = [ "multi-user.target" ];
      serviceConfig = {
        PremissionsStartOnly = true;
        RemainAfterExit = true;
        ExecStart = ''
          ${usecaseConfScript}
          ...
        '';
      };
    };

    I personally use one systemd service to apply all configurations for the database. You may prefer using multiple systemd unit files.

    Creating a Nix module

    It is good practice to create NixOS modules as it allows the code to be reusable and better organised.

    A NixOS module is created by adding path/to/module.nix file.

    {
      lib,
      config,
      pkgs,
      ...
    }:
    {
      # Content of the module
    }

    More specifically the module will define a NixOS option called mysqlInitialConfiguration so it can be used in the configuration.nix:

    {
      lib,
      config,
      pkgs,
      ...
    }:
    {
      options.mysqlInitialConfiguration = {
        enable = lib.mkEnableOption "Activate initial MySQL configuration";
        configurations = lib.mkOption = {
          default = [ ];
          description = ''
            List of initial MySQL configurations
            For instance :
            [
              {
                database = "usecase_db";
                passwordFile = config.age.secrets.usecasePass.path;
                username = "usecase_username";
                hostname = "usecase_hostname";
              }
            ]
          '';
        };
      };
    }

    Now this defines the NixOS option but not what happens when it is enabled and configured. To do so we need to add the config part of the option which applies a configuration based on option.

    {
      lib,
      config,
      pkgs,
      ...
    }:
    {
      options.mysqlInitialConfiguration = {
        enable = lib.mkEnableOption "Activate initial MySQL configuration";
        configurations = lib.mkOption = {
          default = [ ];
          description = ''
            List of initial MySQL configurations
            For instance :
            [
              {
                database = "usecase_db";
                passwordFile = config.age.secrets.usecasePass.path;
                username = "usecase_username";
                hostname = "usecase_hostname";
              }
            ]
          '';
        };
      };
    
      config = lib.mkIf config.mysqlInitialConfiguration {
        # Actual configuration
      };
    }

    Now we add the actual configuration (systemd files, scripts, …) and for practical reasons use the let ... in ... nix clause.

    {
      lib,
      config,
      pkgs,
      ...
    }:
    let
      applyMySQLConf =
        {
          database,
          passwordFile,
          username,
          hostname,
        }:
        pkgs.writeShellScript "applyMySQLConf" ''
          PASSWORD=$(cat ${passwordFile})
          ${pkgs.mariadb}/bin/mysql -u root -e "GRANT ALL PRIVILEGES ON ${database}.* TO '${username}'@'${hostname}' IDENTIFIED BY '$PASSWORD';"
        '';
    
      # Function taking a list as input and returns a string
      genSystemdScript = list: lib.strings.concatStrings (map (conf: applyMySQLConf conf + "\n") list);
      systemdScript = pkgs.writeShellScript "mysqlInitialConfiguration" ''
        ${genSystemdScript cfg.configurations}
      '';
    
      cfg = config.mysqlInitialConfiguration;
    in
    {
      options.mysqlInitialConfiguration = {
        # ...
      };
    
      config = lib.mkIf config.mysqlInitialConfiguration {
        systemd.services.mysqlInitialConfiguration = {
          description = "Initial MySQL configuration";
          wants = [ "mysql.service" ];
          wantedBy = [ "multi-user.target" ];
          serviceConfig = {
            PermissionsStartOnly = true;
            RemainAfterExit = true;
            ExecStart = "${systemdScript}";
          };
        };
      };
    }

    Note that config.mysqlInitialConfiguration is replaced with cfg in the config part.

    Now the new option can be used in the configuration.nix file as so:

    {
      # ...
    }:
    {
      # ...
      imports = [
        # ...
        ./path/to/mysql/module.nix
        # ...
      ];
      # ...
      mysqlInitialConfiguration.enable = true;
      mysqlInitialConfiguration.configurations = [
        {
          database = "usecase_db";
          passwordFile = config.age.secrets.usecasePass.path;
          username = "usecase_username";
          hostname = "usecase_hostname";
        }
      ];
    }

    Summary

    In this article I show to apply MySQL user configuration automatically using Nix and put all of this in a module.
  • Publishing a pelican website using nix

    This website is statically generated using pelican and development on the website is done via nix flakes. Here is how :

    Overview

    I use pelican to publish this website. Pelican is a python based command line tool to generate a static website. Pelican requires writing the articles in reStructuredText or Markdown and placing these files in a folder which I call content. To generate the website I simply run a command

    pelican -r content -o output -s pelicanconf.py

    I will not cover the details on how to install Pelican. In the above command I specify the source folder content, the output destination folder and finally a configuration file called pelicanconf.py that contain various website information like the name of website, the locale or the theming.

    While pelican is simple, it still requires a lot of small steps every time you want to publish an article. Which is why I use nix to automate as much as possible to leave as little friction.

    I will explain how I use Nix flakes to manage dependencies, build the website and run it locally. I will leave publishing for possible future article.

    Creating a development environment (nix-shell)

    The purpose of a nix shell is to have a shell environment where all the tooling is installed and one can develop various helper scripts (e.g. script to run the website locally).

    First I create the flake.nix file:

    {
        description = "Simple blog project";
        inputs = {
            nixpkgs.url = "github:NixOS/nixpkgs/nixos-24.11";
        }
        outputs = { self, nixpkgs }: let
            system = "x86_64-linux";
            pkgs = import nixpkgs { inherit system; }
            deps = with pkgs; [
                (python3.withPackages (ps: [ ps.pelican ps.markdown ]))
            ];
        in {
            devShells.${system} = pkgs.mkShell {
                buildInputs = deps;
            };
        };
    }

    Basically this tells how to make a shell environment with pelican installed and markdown support. It can be invoked like this:

    nix develop
    pelican -r ./content -o ./dev-output -s pelicanconf.py

    However, this may not work for everyone because I use an external theme.

    When it is not a flake project (i.e the project root does not have a flake.nix) we turn the external dependency into a derivation from scratch. This can be done using fetchFromGitHub:

    {
        description = "Simple blog project";
        inputs = {
            nixpkgs.url = "github:NixOS/nixpkgs/nixos-24.11";
        }
        outputs = { self, nixpkgs }: let
            system = "x86_64-linux";
            pkgs = import nixpkgs { inherit system; }
            pelican-flex-theme = pkgs.fetchFromGitHub {
                owner = "alexandrevicenzi";
                repo = "Flex";
                rev = "master";
                sha256 = "sha256-I/WEqFMZbnJvX4NMeqB+o9LzD4im1BwOwgaqqDqbL2s=";
            };
            deps = with pkgs; [
                pelican-flex-theme
                (python3.withPackages (ps: [ ps.pelican ps.markdown ]))
            ];
        in {
            devShells.${system} = pkgs.mkShell {
                buildInputs = deps;
                shellHook = ''
                  export PELICAN_THEME=${pelican-flex-theme}
                '';
            };
        };
    }


    Now after running nix develop I can access the path to the theme via the environment variable PELICAN_THEME (which happens to be what I use in pelicanconf.py).

    Building the website

    Next step is to implement the build step. This is done by specifying the packages.${system}.default output derivation. Now
    by building the website, I mean generating the static files, not running a local instance. Running the website locally will be explained later.

    {
        description = "Simple blog project";
        inputs = {
            nixpkgs.url = "github:NixOS/nixpkgs/nixos-24.11";
        }
        outputs = { self, nixpkgs }: let
            system = "x86_64-linux";
            pkgs = import nixpkgs { inherit system; }
            pelican-flex-theme = pkgs.fetchFromGitHub {
                owner = "alexandrevicenzi";
                repo = "Flex";
                rev = "master";
                sha256 = "sha256-I/WEqFMZbnJvX4NMeqB+o9LzD4im1BwOwgaqqDqbL2s=";
            };
            deps = with pkgs; [
                pelican-flex-theme
                (python3.withPackages (ps: [ ps.pelican ps.markdown ]))
            ];
        in {
            devShells.${system} = pkgs.mkShell {
                buildInputs = deps;
                shellHook = ''
                  export PELICAN_THEME=${pelican-flex-theme}
                '';
            };
            packages.${system}.default = pkgs.stdenv.mkDerivation {
                name = "my-website";
                src = ./.;
                nativeBuildInputs = deps;
                buildPhase = ''
                    export PELICAN_THEME=${pelican-flex-theme}
                    pelican content -o output -s pelicanconf.py
                '';
                installPhase = ''
                    mkdir -p $out
                    cp -r output/* $out
                '';
            };
        };
    }


    Just like a Makefile we specify how to build the project using the buildPhase and how to install using the installPhase; all of this within stdenv.mkDerivation.

    There is however one problem with this derivation. It fetches all the files instead of only the files it needs. To fix this I use gitignore.nix which filters the source folder using the .gitignore file.

    {
        description = "Simple blog project";
        inputs = {
            nixpkgs.url = "github:NixOS/nixpkgs/nixos-24.11";
            gitignore = {
                url = "github:hercules-ci/gitignore.nix";
                inputs.nixpkgs.follows = "nixpkgs";
            };
        }
        outputs = { self, nixpkgs, gitignore }: let
            # ... previous code omitted ...
            deps = with pkgs; [
                pelican-flex-theme
                (python3.withPackages (ps: [ ps.pelican ps.markdown ]))
            ];
            inherit (gitignore.lib) gitignoreSource;
        in {
            # ... previous code omitted ...
            packages.${system}.default = pkgs.stdenv.mkDerivation {
                name = "my-website";
                src = gitignoreSource ./.;
                nativeBuildInputs = deps;
                buildPhase = ''
                    export PELICAN_THEME=${pelican-flex-theme}
                    pelican content -o output -s pelicanconf.py
                '';
                installPhase = ''
                    mkdir -p $out
                    cp -r output/* $out
                '';
            };
        };
    }


    Now you can build the website by running the command

    nix build

    You can access the website in the result folder (which is a link to the created derivation in the nix store).

    Launching the website locally

    To run the locally we define an application in the Nix flake file. To run the website locally will be done in three steps : 1. Create a shell script to run the website (using nix of course) 2. Define an application in flake.nix 3. Make the shell script and the package a dependency of the application

    Here is how it is done:

    {
        # ... inputs ...
        outputs = { self, nixpkgs, gitignore }: let
            # ... previous code omitted ...
            deps = with pkgs; [
                pelican-flex-theme
                (python3.withPackages (ps: [ ps.pelican ps.markdown ]))
            ];
            inherit (gitignore.lib) gitignoreSource;
            static-website = pkgs.stdenv.mkDerivation {
                name = "my-website";
                src = gitignoreSource ./.;
                nativeBuildInputs = deps;
                buildPhase = ''
                    export PELICAN_THEME=${pelican-flex-theme}
                    pelican content -o output -s pelicanconf.py
                '';
                installPhase = ''
                    mkdir -p $out
                    cp -r output/* $out
                '';
            };
        in {
            # ... previous code omitted ...
            packages.${system}.default = static-website;
            apps.${system}.default = let
                serv = pkgs.writeShellApplication {
                    name = "serve";
                    runtimeInputs = [ static-website ] ++ deps;
                    text = ''
                        pelican --relative-urls -p 8080 -l ${static-website}
                    '';
                };
            in {
                type = "app";
                program =" ${serv}/bin/serve";
            }
        };
    }

    In the above code we refactor the code by moving the package definition into the static-website variable in the let ... in ... clause. We also create a sub-component as a shell application derivation called serv which simply run the pelican local server.

    To run the website locally simply do

    nix run
    resulting_image

    Updating the website

    Now if you make changes to your website (e.g. add a new article markdown file) you may not see the changes after running nix run or nix build, the most likely reason for this is that flakes track the latest state of the git repository; meaning you may need to git add files for changes to be reflected.

    Summary

    In this article I show how to use Nix flakes to manage the development life-cycle of a statically generated website using pelican.

    Nix flakes are used to manage the development environment (like virtual environments in Python), build the website (like in make build) and run the website locally (like a docker run).

  • Converting Archlinux with BTRFS into NixOS

    Recently I have converted my laptop from Archlinux into NixOS without reformatting or plugging a USB live distro and kept my home partition as is. This was done from the existing Archlinux install.

    The former system was installed on top a BTRFS root sub-volume. I use that to my advantage. These steps are for NixOS specifically but in principle could be done with other distributions.

    Former setup

    The former setup is Arch installed on top of BTRFS with full disk encryption with systemd-boot (on EFI). Two sub-volumes were used : root and home used respectively for / and /home/. The layout can be summarized by

    $ lsblk
    NAME         MAJ:MIN RM   SIZE RO TYPE  MOUNTPOINTS
    zram0        253:0    0     8G  0 disk  [SWAP]
    nvme0n1      259:0    0 476,9G  0 disk  
    ├─nvme0n1p1  259:1    0   512M  0 part  /boot
    └─nvme0n1p2  259:2    0 476,4G  0 part  
      └─cryptdev 254:0    0 476,4G  0 crypt /home
                                            /
    $ btrfs subvolume list /
    ID 256 gen 2394 top level 5 path root
    ID 257 gen 2394 top level 5 path home
    (... some lines are omitted here)

    The goal will be to create a new root sub-volume for NixOS called nixos_root

    Installing NixOS tools

    First we need to get nix tools, this is done by installing nix the normal way.

    sh <(curl -L https://nixos.org/nix/install) --daemon

    Reopen the shell and install NixOS installation tools.

    nix-channel --add https://nixos.org/channels/nixos-24.05 nixpkgs
    nix-env -f '<nixpkgs>' -iA nixos-install-tools

    Prepare environment

    Just like a regular CLI install we are going to prepare /mnt/ to host the future system (which happens to be on the same disk as the current system). Please adapt the following steps to your disk layout :

    mount /dev/mapper/cryptdev /btr_pool 
    btrfs subvolume create /btr_pool/nixos_root
    mount -o subvol=nixos_root,compress=zstd,ssd,space_cache=v2,noatime /dev/mapper/cryptdev /mnt
    mkdir /mnt/home && mount -o subvol=home,compress=zstd,ssd,space_cache=v2,noatime /dev/mapper/cryptdev /mnt/home
    mkdir /mnt/boot && mount /dev/nvme0n1p1 /mnt/boot

    Install NixOS

    First prepare the NixOS configuration files: * /mnt/etc/nixos/hardware-configuration.nix * /mnt/etc/nixos/configuration.nix

    This is almost identical to a regular install of NixOS from an live NixOS environment. It just requires some path modification.

    PATH="$PATH" NIX_PATH="$NIX_PATH" `which nixos-install` --root /mnt

    You can now reboot to the new system. I had to run from the NixOS a command to make nix commands work. Basically update the channel files:

    nix-channel --update

    In principle at boot time you should be able to choose between the old system (Archlinux) and the new system (NixOS). If you do keep both systems keep in mind NixOS might modify the location of files like ~/.bashrc.

  • Converting docker containers into AppImages

    In Linux, software is conventionally distributed through packages, usually compressed folders including executables, installations scripts and various configuration files. These packaging formats come in various flavors like deb packages, RPMs, and many others. While very useful, these packaging formats have a downside: they are distribution specific. Even if two distributions use the same packaging format, like say Ubuntu and Debian, they are not compatible. Meaning that a deb package built for debian is not expected to work on Ubuntu and vice-versa. In goes even further, packages may not be compatible between two different releases of the same Linux distribution, for instance Debian stable and Debian unstable. The main consequence of this limitation is that software needs to be built for every combinations of Linux distribution / releases out there.

    For simple open source software this isn’t usually a big issue, as volunteers can usually take the code and release it for the distribution of their choice making small adjustments to the code (at least in principle). For more complicated software and proprietary software this is trickier. However there is a solution to this problem: recently new universal, meaning distribution agnostic, packaging formats have been created. The main ones are Flatpak, Snaps and AppImage. But there are many others, technically Docker is also a means to distributed software (usually server-side software) on many Linux distributions (as well as Windows). Steam distributables can also be counted, if you think about it. And even Nix packages are in some way distribution agnostic as you can install Nix on many Linux distributions.

    I personally think AppImage lacks a little bit of love. It does not offer as many features as Flatpak or Snaps, which handle sand-boxing, software distribution, and sharing frameworks, but it is very simple and easy to grasp. AppImages is already fairly popular amongst QT applications, electron applications, and some games like OpenRA. By the way that is no coincidence, among the tools to build appimages, some are specifically tailored for QT applications and electron applications. This, in my view, creates a disparity, so I wondered if I can make a difference. So I decided to create another tool to create AppImages, but from Docker containers, a tool I am familiar with. Furthermore the creation of Docker images and containers is very well documented and the collection of publicly available Docker images is very large. The tool’s name docker2appimage available on Github at https://github.com/mparusinski/docker2appimage.

    If you have a container called relaxed_beaver, to create an AppImage which triggers the container default command, you run.

    docker2appimage relaxed_beaver

    You can perform more complex tasks like request docker2appimage to create a container from the alpine Docker image and create a container that calls ls and give the AppImage the name alpine-ls

    docker2appimage -x ls –name alpine-ls -i alpine

    In order to work the tool requires the appimagetool AppImage to be accessible on the path as well imagemagick to be installed on the system. The entire tool is a simple shell script for it is designed to be portable.

    Here is an even more complex example where we create an universal binary for ripgrep a popular alternative for grep

    docker run -it –name=ripgrep ubuntu # Creates a container called neofetch
    apt-get update && apt-get install -y ripgrep # Command within the container
    exit # Leave the container
    docker2appimage -x rg ripgrep

    The last commmand creates an AppImage called neofetch from container neofetch which launches neofetch

    Most Docker images are server side software (e.g. nginx), OS containers (e.g. alpine) and programming frameworks. Naturally docker2appimage will fit well to create CLI only AppImage. This is not what AppImage are usually intended, they are usually intended for Desktop applications. It is still possible to create GUI applications, and there is a case for CLI AppImages as a replacement for statically compiled binaries. In other words this offers an approach for portable CLI applications.

    There are some limitations of course. Many Docker images default commands are shells like bash, sh, … one might even include Python as a type of shell. AppImage works by doing tricks with environment variables and Fuse to create a pseudo virtual environment where a command is launched from within the AppImage. This makes handling shell commands trickier, so it is not supported, instead it is better to use the -x flag that allows the user to specify the command to launch.

    The project is still ongoing development to support many applications and Linux distributions. If you have some time and are curious do not hesitate to test the tool and report any bugs you see.

  • Pixel Pal (PART 6) : Early progress reports

    Pixel Pal is a project I have started whose purpose is to bring new life to old icon themes. Many old icon themes are in raster format and are not available for HiDPI screens (their resolution are too small). Currently the only way to handle old icon themes is to resample them by the desired factor, but the icons look pixelated.

    Here is a link to a PDF showing progress in the project. The PDF showcases various models performing data augmentation. The results are still blurry

    32 x 32 pixel version of the icon32×32 augmented with one of the models64×64 pixels version of the icon
    32 by 32 pixels version of the icon32 by 32 pixel augmented with neural network64 by 64 pixels version of the icon